- Animated textures
Use image sequences formats (jpeg, png, etc.), instead of movie formats (avi, mp4, etc.) or else it will not work on the farm.
- Cloud manager on MacOS Catalina startup.
With the new OS for Mac you need to allow the cloud manager inside Security & Privacy.
To do this, open up System Preferences -> Security & Privacy and start the cloud manager. Hit cancel when you get a warning.
After that the cloud manager will show up in the Security & Privacy settings. Hit allow and you can now open the cloud manager.
Soon we will have a OS certificate that will eliminate this problem.
- Crypomatte render with Cycles 4D
Crypomatte passes are an amazing post production tool and important for a lot of users. It's fully supported on the farm and requires no additional setup. Just do what you normally do and it will render correctly.
- Crypomatte render with Octane
Crypomatte passes are an amazing post production tool and important for a lot of users. It's fully supported on the farm and requires no additional setup. Just do what you normally do and it will render correctly.
- Crypomatte render with Redshift
Crypomatte passes are an amazing post production tool and important for a lot of users. It's fully supported on the farm and requires no additional setup. Just do what you normally do and it will render correctly.
- Custom Plugin Version
Our plugin is so intelligent that it will detect all your plugins and also what version you are using. By default all these things happen automatically.
For example, when you are using Redshift our plugin will check your version and use this on the farm. So it doesn't matter if you are on a very old release or the latest. We've got you covered. The same thing happens to X-Particles, TFD or any GSG product.
The custom plugin field is something that is used when we give you support. Maybe a version is not working correctly on your job. And with this we can give you access to other versions.
The replace button can overwrite the auto search, meaning that you have to enter everything manually. Again is something that is used while giving support.
- Custom Pool
A pool is a selection of nodes that we have available. This option can be useful for test frames or single frames. Don't use this for all your renders because the real speed of a render farm comes with amount of nodes you get.
Here some examples:
ENTER: CPU
You will get the strongest nodes available. All these nodes have Cinebench scores over 3000. Good for single frames or quick test renders.
ENTER GPU
In this pool there are only GPU machines with 4 cards or more active. Being 4 times 1080 ti or 2080 ti cards. We even have some 10 * 2080 ti machines and one 10 * Titan RTX machine (on request).
ENTER MEMORY
Enter this if you need nodes with more than 64 gb of memory.
- GI Rendering with Standard or Physical renderer?
We support GI for most render engines, for the standard and physical render engine we advise to use QMC as primary and optional secondary method. This will give the best results and doesn't require a pre pass render. If you really need Irradiance Cache or Light mapping we created a special script that will help you with this. You don't need to worry about this since this is fully automated.
What is this script?
We load in your project in memory before we start rendering your frame, in this phase we run a script that will create the GI cache to the correct location, all without any delay.
- Higher costs than calculated
The price calculator is an estimate, this is due to the many variables that come with rendering.
The most common problem is the startup and pre-calculation time. Since by default every node gets a single frame, each time a frame starts it needs to start Cinema 4D and load the project. With heavy geometry or objects this can take 1 or 2 min. After that, there are maybe startup calculations like simulations, GI, ect.
When you have render times under 10 min per frame you lose time and thus credits with each frame.
We made a fix for this called: Custom slice number. Where you feed multiple frames into one server.
If your are still having doubts about the costs please send us this information:
- Your workstation specs (Processor, GPU and memory installed).
- Your project specs (Amount of frames, time to complete a single frame).
- The name of your project that you've submitted to the farm.
- Optional: copy the log file from your project folder inside an email for us to see all the details.
- How does the custom plugin feature work?
Drop & Render made a very unique system when it comes to working with Third Party Plugins. On our farm we have all versions of the plugins we support.
Here is how it works!
When you click the check scene button in our plugin, we will go over your scene and check all active third party plugins. After that we check what version you are using. All this happens in the background, meaning that you don't have to do anything.
For example:
You are working with Redshift as your render engine and X-Particles for your particles simulations. Our plugin will detect your versions and use this to create environment variables on our farm. When you submit the job it will load your plugin versions. This way we eliminate version differences, making sure your renders will come out like you created them.
We always have the latest releases ready, but you can always contact us to make sure.
- How to get a good estimate for my job?
The most accurate way to get an estimate is to render a few frames on the farm and multiple that by the amount of frames you need to render.
If you like to get a good estimate upfront we have two other options.
1. Use the
online costs calculator, this the most rough estimate but it will give you a good idea on the final costs.
2. Use our deadline control feature. This is an option inside the C4D plugin that will not only give you a price estimate but also tell you when the job will be ready. Look here how it works.
- How to render a single image with Tile rendering.
In our new update Tile Rendering is as easy as it can be.
In you have a big still image click the "Tile Render" checkbox inside the Drop & Render C4D plugin. Now projects will be rendered on multiple machines.
- How to render Octane render passes
Just like you would to locally, setup your path inside the Octane render pass settings and we will convert this path with a special script on the farm.
Like to know how we do it?
We load in your project in memory before we start rendering your frame, in this phase we run a script that will convert your render pass path to a location on our NAS. All without any delay. After that we upload this frame back to your workstation. All seamless just like a local render:)
- How to setup your RealFlow cache
There is no special setup needed. You can setup your cache as an absolute path just like you normally would. Our C4D plugin is smart enough to find all your cache files and remap the path on our side.
- How to use Turbulence FD on the farm?
If you are using TFD version 1465 or higher there is no setup needed. Our plugin will take care of everything.
If you have an older version you need you to make the path relative, our plugin will detect if you have an older version.
The relative path must be to the folder that holds the folder of your simulation cache (contrary to what would make sense).
This means, if your simulation cache is in a folder called "Cache 001" and that folder is sitting in the same folder as your scene file, the relative path to your cache would simply be "./", meaning the folder holding your scene file.
Step by step:
If you already made your cache, place the folder inside your project folder.
Go to the TFD settings and enter: ./ In the path field.
For a new simulation, point the simulation path to your project folder. Run the simulation and after that enter ./ in the path field.
- I cannot submit my job from the Cinema 4D Plugin
Follow the steps below:
1. Make sure that you are conntected to the cloud manager
2. Did you install the cloud manager on the default location:
Mac: /Applications/dropandrender
PC: C://Program Files/SquidNetSoftware/dropandrender
If not, you can adjust the default location in the advanced tab in the C4D plugin. But we strongly advise to use the default method if possible.
3. Try placing your job on a local drive, for example your desktop and try again.
4. Take a look at the console file inside Cinema 4d (shift + F10). Go to the python tab and send us a screenshot after you hit the submit button inside the plugin.
It will also really help if you upload the log file that is inside your project folder.
- I'm getting an error for absolute paths
For everything to work on the farm you need all your assets to be relative to the project folder. First step is always saving your project with assets. This button can be found inside the plugin under Tools or in the drop down menu in C4D under file.
For textures this will almost always be enough to make everything relative to the project folder, but for some third party plugins you need to do an extra step. For example: HDR Studio Rig, XP Cache, Realflow importer and TFD cache. The C4D plugin will help you with all these steps.
If you look at the file path you see for example:
C:DocumentsFilesRealflowMycachefile.bin
This path is looking at your computer and will not be uploaded by the cloud manager. To fix this you must place everything inside your C4D project directory folder. After that manually adjust the link in the file path.
Adjust it manually like this:
Mycachefile.bin
Now it's a relative path and the cloud manager will upload en render all files correctly.
- My job is on error state, what to do?
Follow to steps below:
1. Most errors we get with Cinema 4D are assets errors. All your assets must be included in your project folder. Save your project with assets inside Cinema 4D.
2. Are you running R16 or lower and you use third party plugins, try to set the application profile to R18 or R19. You can do this inside the plugin in the advanced tab.
3. Are you using third party plugins? Take a look at our specs page to see if your plugin is supported.
4. Hold crtl+shift while pressing the submit button, this will create a log file inside the console of C4D. And see if you find any problems.
5. Still having problems? Send us your project details (including log file) and we will get back to you as soon as possible.
Here is how to make a log file:
Please press the submit button while holding down CTRL + SHIFT this will create a log file inside the Cinema 4D console.
To open the console press SHIFT + F10 or go to scripts -> console.
Copy and paste this text and send it to us. This will help us to beter understand your project.
- My project is on Caching project folder?
First we compress the project folder on your workstation. We take the root folder of your Cinema 4D project. This process is called: Caching Project Folder. The speed of this depends on the processing power of your CPU. Please take a look at the size of your project folder to get an estimate of the time it will take.
Next step is uploading the project to our servers. We have a 500 Mbps download speed, so uploading should go very fast depending on your upload speed.
We decompress the files at our servers and the project starts rendering.
- Nothing happens when I click submit
Follow the troubleshoot steps below.
If the first suggestion doesn't work go to the next:
- Login to the cloud manager.
- Make sure to install the cloud manager on the default location.
Mac: /Applications/DropandRender
PC: C://Program Files/SquidNetSoftware/DropandRender/
- Reset the advanced tab inside the C4D plugin.
- Save your .c4d project to a local disk.
Still not working, please send us the log file that is inside your project folder.
- Octane output not the same as on my local workstation
Most of the time this happens because of the environment color of your Octane settings. This setting is not transferred between projects. See the solution for this below:
Please check if your environment color inside Octane setting is different from the default (RGB 153, 153, 153). If so this is the problem.
To fix this:
- Change back your environment color in Octane to the default (RGB 153, 153, 153).
- Add an Octane Sky with the environment tag, and change the value to your desired value.
Now you will have the same result and it will render correctly on the farm.
If this was not the solution, contact us and tell us what Octane version you are using and what output settings you have.
- Redshift Proxy Workflow
Redshift proxy files are fully supported on the farm. If your proxy file also includes textures, you need to make sure they have relative paths to the final .c4d project. Unfortunately, we can't remap the Redshift texture files since there is no API available for this purpose (meaning we can't change it with a script).
To solve this in Cinema 4D:
- Open the original proxy file (.c4d file).
- Convert all texture paths to relative paths (you can easily do this by saving your project with assets).
- Save this file to the location of your main .c4d project.
- Now export the .rs file to the same folder as your main .c4d project.
- Import the proxy file into your main .c4d project, and everything should be ready.
To solve this in Houdini:
- Open the original proxy file (Houdini).
- Watch this Youtube Video to learn how to convert all paths.
- Now export the .rs file to the same folder as your main .c4d project.
- Import the proxy file into your main .c4d project, and everything should be ready.
If possible, we recommend working with Alembic files. They have all the benefits of Proxy files but don't require any setup
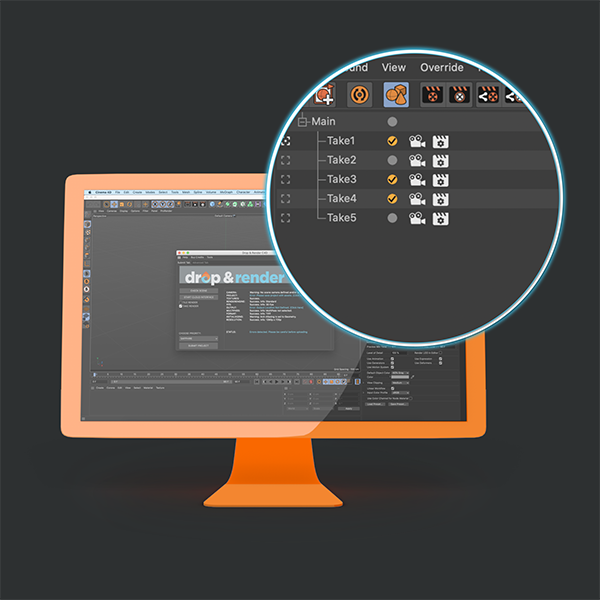
- Render with the Take system
Rendering with takes has never been so easy on a render farm.
All you have to do is check the Take rendering. Now all marked takes will be rendered. You can use the C4D tokens or set different output paths if needed. But make sure all thanks have different output locations or names.

- Render with X-particles XPCache
If you use X-Particles with R19 or above and have smart sync turned on rendering with XP is as simple as rendering locally. We will gather all the cache files for you and convert the paths here on the farm. Our plugin will help you with this.
If you are running R19 or below or turned off smart sync you need to render XP with the setup method below:
When using XP4 with cache you need to make sure it's a relative path. Inside the XPCache there is a little button called "Cache files with assets. You find this button when you click on the little arrow icon next to the folder path (see image below).
After turning on this button you need to save your project with assets again. Now Cinema will import all your cache files into your project directly and you can successfully upload your render.
When you've followed the steps correctly, now the file path is empty and your simulation still works inside C4D.
You can also use the internal memory function to use XPcache. But this is only advised when you have a small cache file.
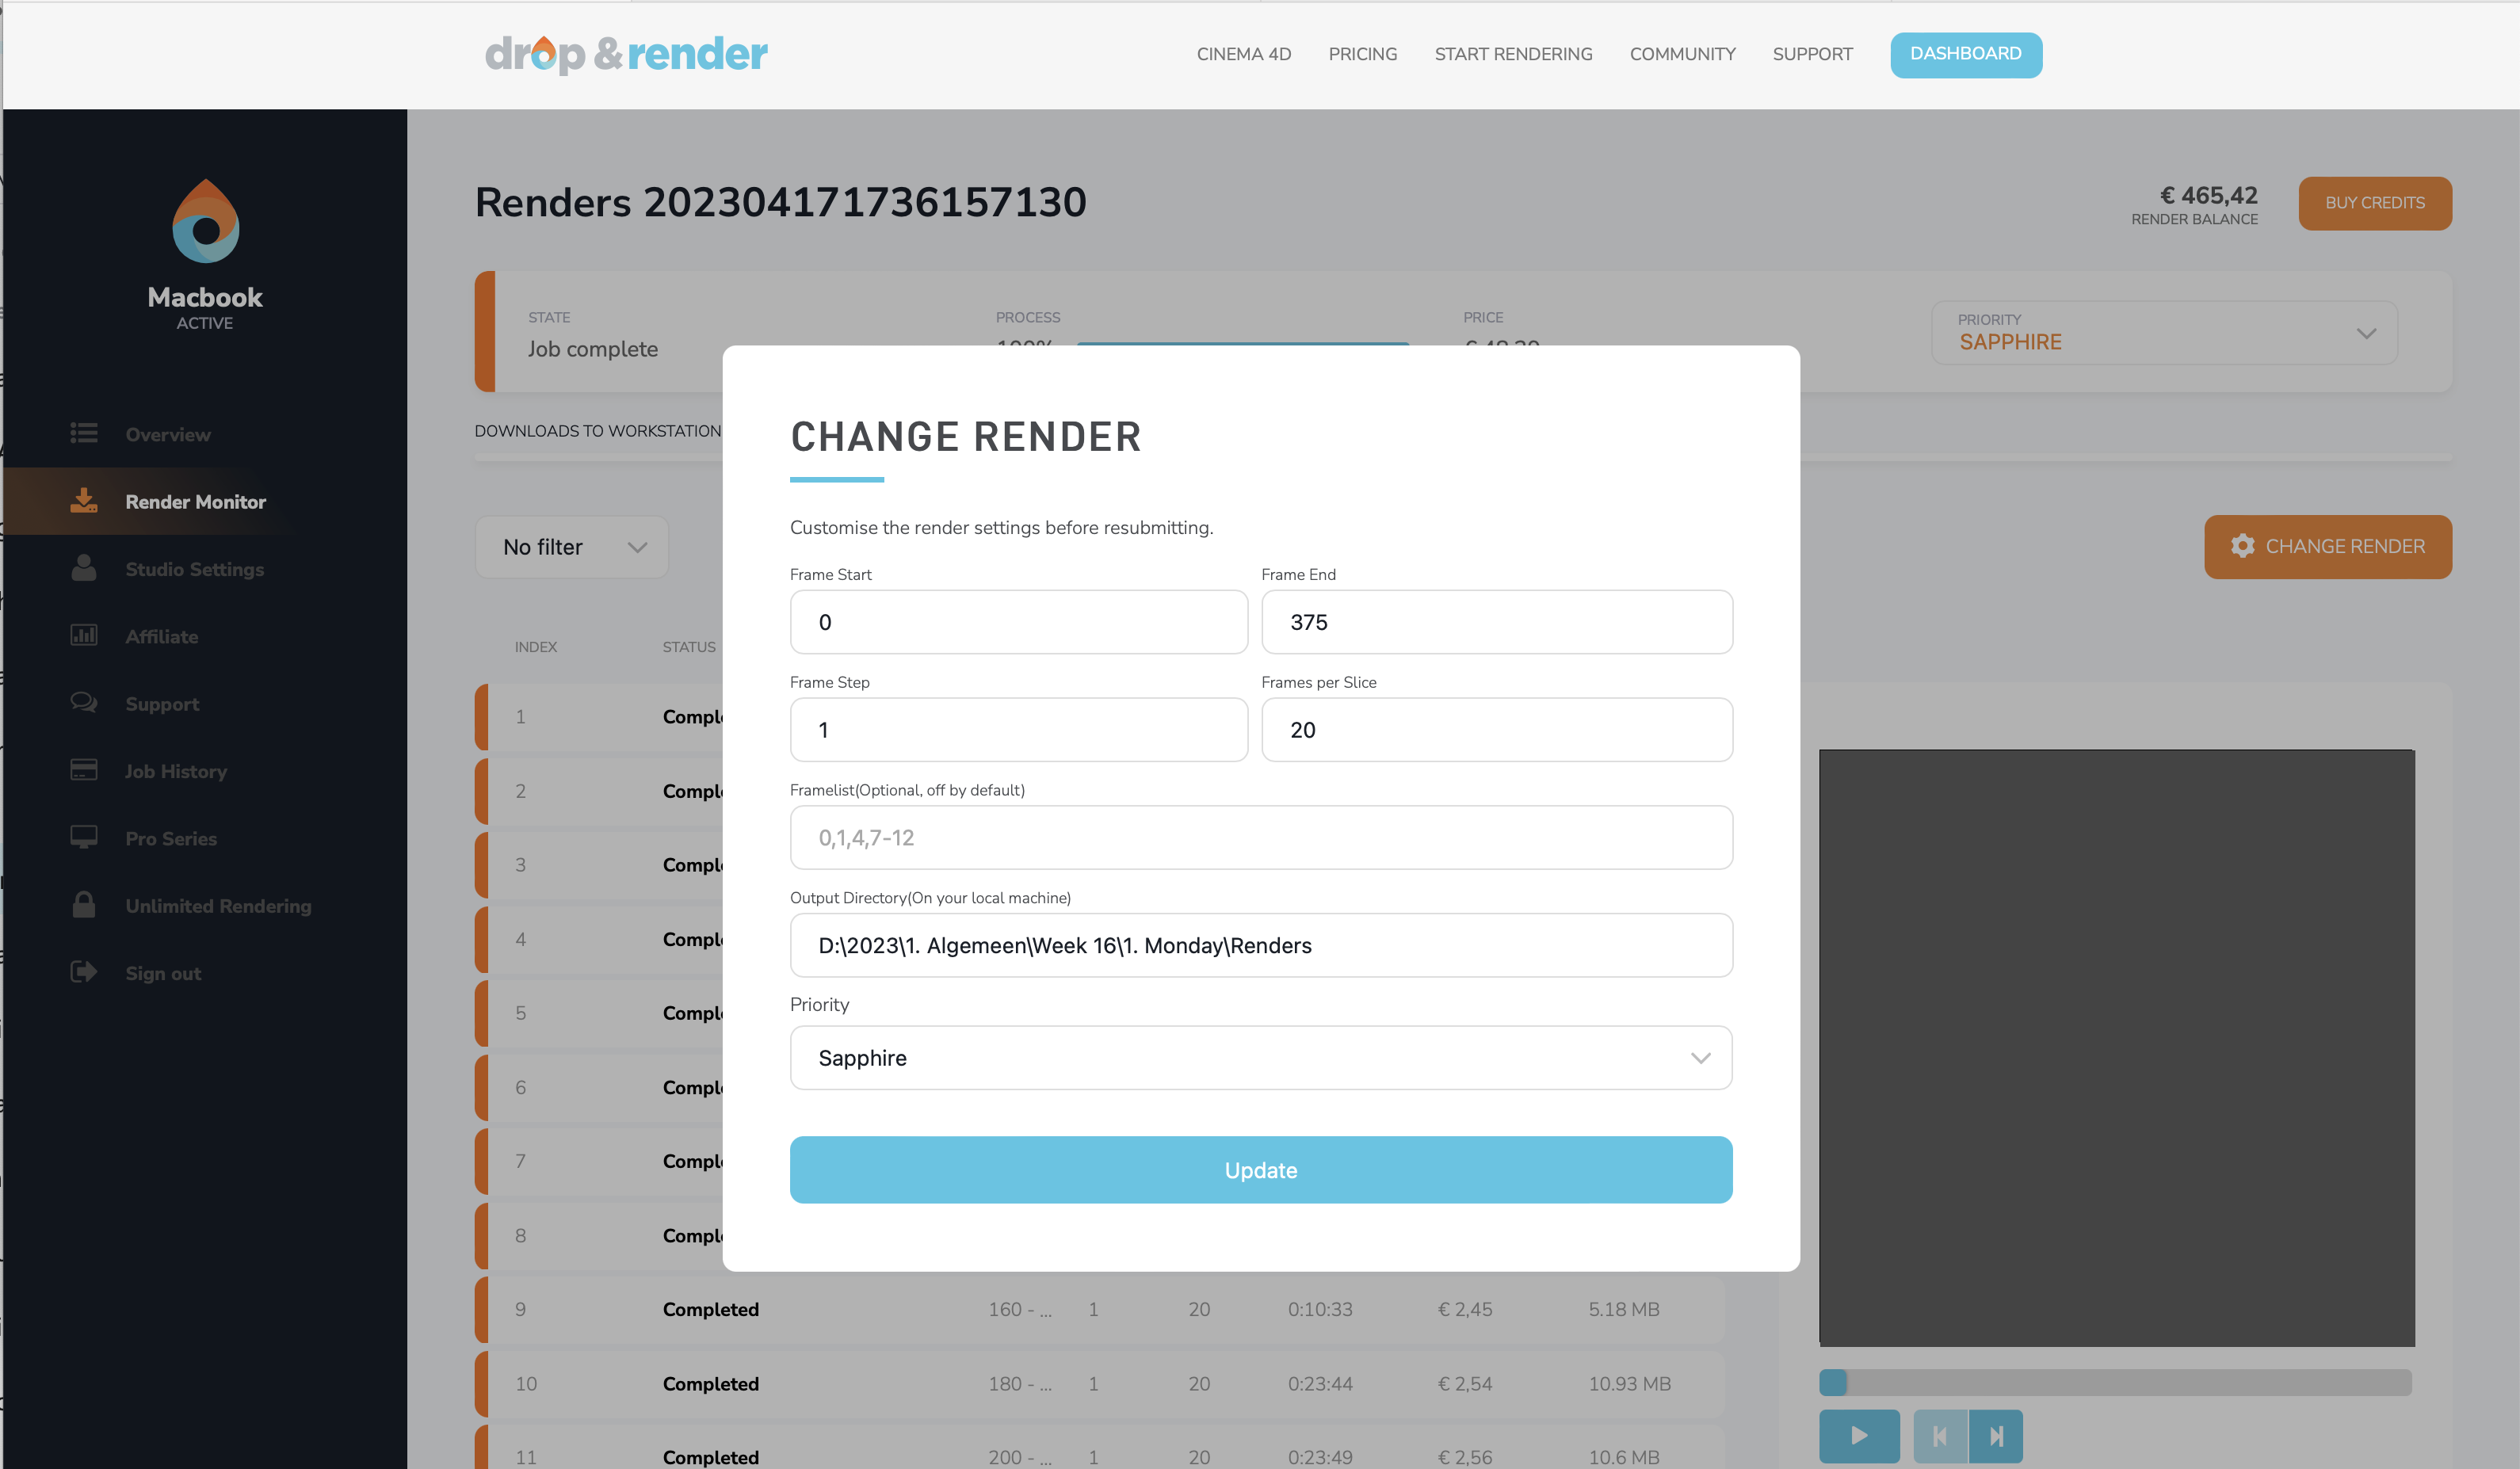
- Resubmit your job without re-uploading it.
After you submit a test frame to the farm and everything looks correct you can use our resubmit feature to change the frame range without uploading the job again.
To use this feature, go to the online dashboard and click on your job.
On the top right you see "change render" button. Here you can adjust the frame range, frame per slice and if needed you can enter a frame list.
Keep in mind that this will always overwrite the existing job in the queue (if still present)
- Some really useful tips!
30% FASTER
If your render finishes within 5 min per slice on the farm you can change the custom slices to speed up the render farm without extra costs. By default every nodes gets a single frame, when you up the slice number, nodes get multiple frames before sending them to you again. This saving startup time and possible calculations from the project.
To do this: go to the advanced tab in the plugin and change the slice number. A good average number is 20 min per slice. So if your frame is taking 5 min, the slice number is 4 (20/5).
Here you can find a video about it:
Custom Slice Number
CHANGE PRIORITY AFTER SUBMISSION
You can change your priority while rendering or waiting in the queue. This can be helpful when you already submitted your job and you notice the long waiting line or you want to make sure your project keeps rendering.
To do this: Open the cloud manager and right click on your job. Click change render queue. This wil open a list where you can change the priority.
Here you can find a video about it:
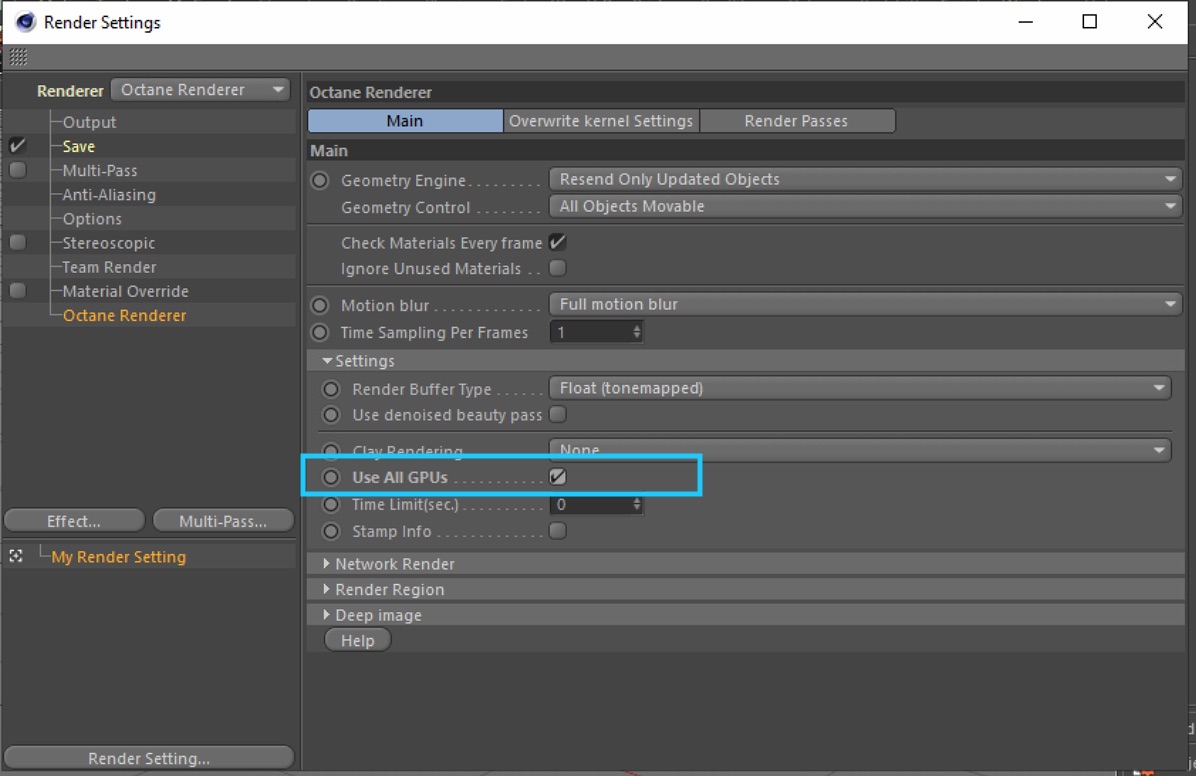
- Turn on ALL GPU option inside Octane
See image below, this will make sure all our nodes utilise all GPU cards. Please don't forgot to save your project after you turned this on.
- What version do you support for my third party plugin?
We actually support all versions, all the latest releases but also older releases. And that for every plugin we support.
Our C4D plugin is so smart that it will detect all your plugins and also the versions of your plugin. After that we create a Cinema 4D instance of your setup.
This way we eliminate version issues causing a way higher succes rate on your jobs.
You can expect that we always have the latest releases of all plugins. We update everything daily.
- What version of Arnold are you using?
We support all versions! How is that possible?
We use environment variables to re-create your version of C4D. So it doesn't matter if you are on the latest release or a release that is a year old. We've got you covered! Pretty cool right?
- What version of Cinema 4D do we support?
We support R15 up to the latest release. (at the time of writing this is R2023)
Both Mac & PC are supported
For more information about this take a look here:
Spec page
- What version of Octane are you using?
We support all versions! How is that possible?
We use environment variables to re-create your version of C4D. So it doesn't matter if you are on the latest release or a release that is a year old. We've got you covered! Pretty cool right?
The plugin will auto detect your version.
- What version of Redshift are you using?
We support all versions! How is that possible?
We use environment variables to re-create your version of C4D. So it doesn't matter if you are on the latest release or a release that is a year old. We've got you covered! Pretty cool right?
The plugin will auto detect your version.
- When I login to the cloud manager there is no window showing up to install the plugin.
Follow the steps below:
1. Do you have Cinema 4D installed on the default location?
PC: C:Program Files/Maxon/Cinema 4D
MAC: Applications/Maxon/Cinema 4D
If not, the cloud manager is not able to find your install and you need to manually add the Application Path. See the steps below:
- Open the cloud manager
- Click help on the top of the page and select -> Preferences
- Open the Plugin Manager
- Right click on the empty field and select 'Add'
- Select the application profile and the Root Application path
- Click Apply.
2. Do you have C4D version R14 or below? The plugin supports from version R15 and up. You can still render, contact us for more information.
3. None of the above are true, contact us.
ps: are you getting an information about permissions, run the cloud manager as administrator to install the C4D plugin.